This is our 2013 Skyline Koala Camper. It’s 29′ long and has a bunk house in the back with four bunks and a bedroom in the front. We purchased it 9 months ago with water damage and remodeled the inside.

We took it on a few trips and while the inside is BEAUTIFUL now, the outside felt lacking. The graphics were faded, the whole exterior had a layer of oxidation and it just looked dull and old.

So, before we list it for sale, I wanted to spend a little time sprucing up the exterior. There are four things that we did:
- Removed some of the old graphics (the koalas & “Koala” text)
- Buffed & waxed the entire exterior
- Painted the decals that were left
- Added a few new decals, too
Below we’ll outline the steps that we took and here are the products that we used:
Product list:
– 3M Stripe Off Wheel ($34.99– we used 2)
– Meguiar’s Oxidation Remover ($14.99)
– Skinny Masking Tape (Only a couple dollars at our local home improvement store)
– Wide masking tape
– Masking paper
– Spray paint (in desired colors)
– Clear Gloss spray paint
– Mountain Decal (we wouldn’t use this specific one again!)
– Swoosh decals from Etsy ($42.00 we got black and charcoal grey)

Step 1: Remove “Ugly” Fade Graphics that we didn’t want
We used a 3M Stripe Off Wheel to remove the graphics that we no longer wanted- namely these koalas– we don’t have anything against koalas, these were just really grainy and faded. There was also the word “koala” on the sides, front and back that we removed, too.


The 3M Stripe Off Wheel worked really well. Tom’s suggestion would be to get two (we used two for everything we removed) and switch off between the two. He noticed that they heated up as he worked and started to get oblong from the heat.


Unfortunately, the front graphic was especially baked on. The Stripe Off Wheel worked, but you could still see where the graphics were. We came up with a plan to address that down below.
Step 2: Wax & Buff with an Oxidation Remover
Because it appeared that the camper had never been waxed and buffed before, there was a heavy layer of built up oxidation. We used this product to remove it, Meguiar’s Heavy Duty Oxidation Remover and it worked great, leaving the camper looking shiny and new.
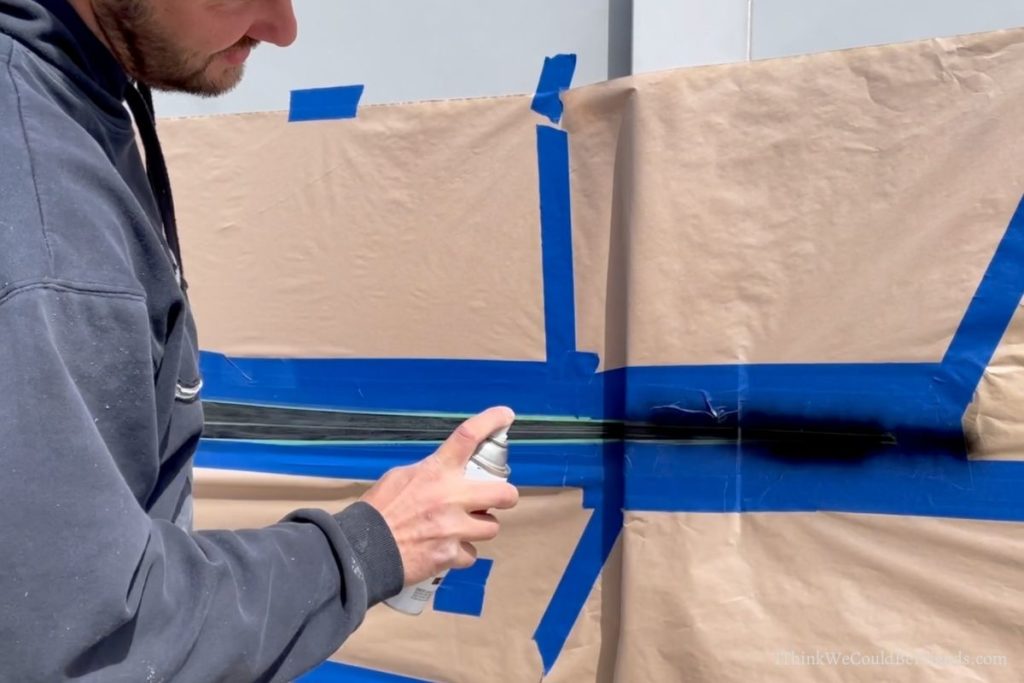
Step 3: Prep & Spray Paint the RV Decals that we wanted to keep
Now this is where this process gets controversial. We knew we were selling it, but wanted to make sure that what we were doing would last for the long haul. I watched this video by RV Street to learn this process. The video is very helpful and thorough, but here are the steps:
1) Use skinny automotive masking to outline each decal.

2) Now add wider painter’s tape around the whole decal.

3) Lightly sand the graphic.

4) Add masking paper. We found that if it wasn’t windy, one width of 12″ masking paper worked fine.

5) Add light coats of spray paint until completely covered then add a clear coat.
6) Remove masking & admire your handiwork!

Step 4: Add extra graphics
There were two reasons that we wanted to add extra decals to the camper:
1) To cover the front where we couldn’t completely remove the koala stickers
2) To fill in the gaps where the koalas were on the sides

For the front we bought a mountain silhouette, but once we realized that the koala on the front wasn’t completely coming off, we decided to add some white vinyl behind it.

For the sides, we bought some high quality “swooshes” from Etsy. They were very easy to use and apply.

I used them as a continuation of some of the other swooshes and thought they turned out great!

VIDEO: Updating our Camper Graphics
(Or watch this video on YouTube here!)
Overall, I’m thrilled with how it turned out. It looks new and current and fresh. We have a few more things to touch up on the inside and then we’ll list her for sale and hope the next owners really enjoy it!
Thanks for visiting and we hope you have a great weekend!
Dawn & Tom


Products Used:
Check out some of our other DIY projects!
>> Our FIRST Camper Makeover Before & After Pictures (and video about why we’re selling it!!)

>> Minimalist Master Bedroom Makeover

>> Budget Bedroom Makeover: Before & Afters! (DIY Ideas under $200)

>> $4 DIY Sponge Paint Pattern Wallpaper – Check out these awesome patterns!

